Looker Studio Report Templates: A Comprehensive Guide to Data Visualization and Collaboration
In today’s data-driven world, businesses need effective ways to analyze and visualize their data to make informed decisions. Looker Studio, formerly known as Google Data Studio, provides a powerful platform for creating interactive and visually appealing reports. Its extensive library of report templates makes it easy for users to get started with data visualization and collaboration.
This comprehensive guide will delve into the world of Looker Studio report templates, exploring their purpose, benefits, and key features. We’ll also cover the steps involved in creating and customizing templates, integrating data sources, and visualizing data effectively. Additionally, we’ll discuss advanced features and best practices for sharing and collaborating on report templates.
Overview of Looker Studio Report Templates
Looker Studio report templates are pre-built, customizable templates that provide a starting point for creating informative and visually appealing data reports. These templates are designed to simplify the report creation process, save time, and ensure consistency across reports. They offer a range of benefits, including:
- Quick and easy report creation: Templates provide a ready-made framework, eliminating the need to start from scratch.
- Consistency and standardization: Templates ensure that reports follow a consistent design and structure, enhancing readability and comparability.
- Time-saving: By using templates, you can avoid the time-consuming task of manually creating and formatting reports.
- Improved data visualization: Templates often include pre-built charts and graphs, making it easy to present data in a visually appealing and informative manner.
Common use cases for Looker Studio report templates include:
- Marketing campaign performance: Track key metrics such as website traffic, conversion rates, and ROI.
- Sales performance: Monitor sales figures, identify trends, and analyze customer behavior.
- Financial reporting: Create financial statements, analyze revenue and expenses, and track cash flow.
- Operational dashboards: Monitor key performance indicators (KPIs) and track progress towards business goals.
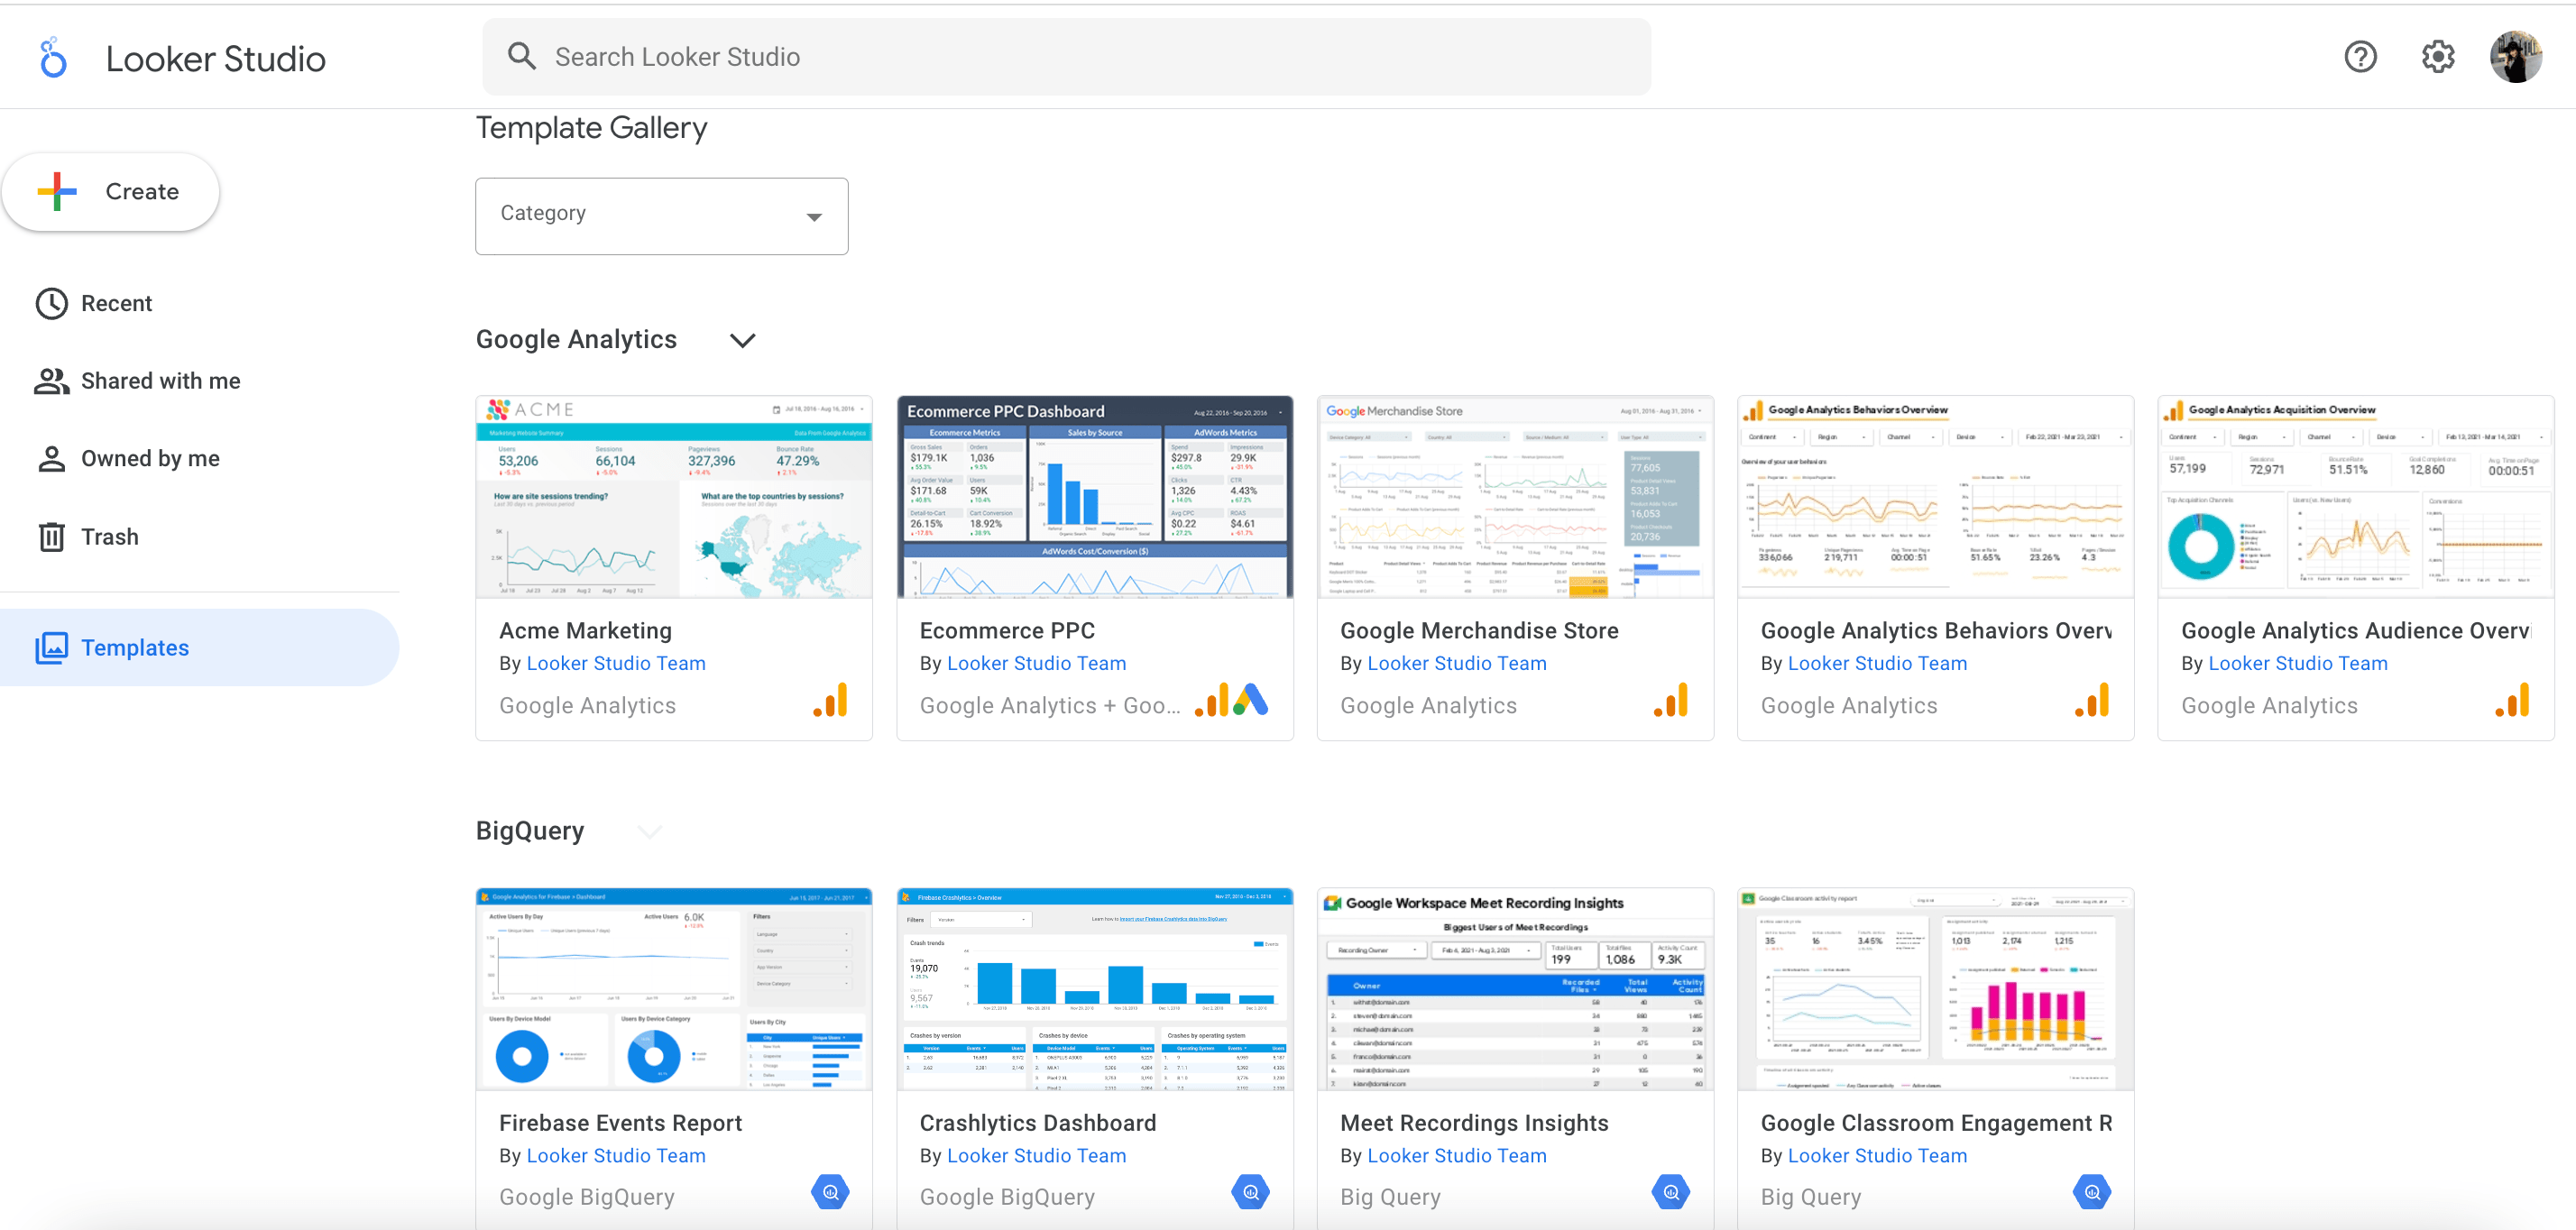
There are various types of Looker Studio report templates available, each tailored to specific use cases. These include:
- Blank templates: Provide a clean slate for creating custom reports from scratch.
- Industry-specific templates: Designed for specific industries, such as retail, healthcare, and education.
- Connector-specific templates: Optimized for use with specific data sources, such as Google Analytics, Salesforce, and BigQuery.
- Community-created templates: Shared by other Looker Studio users, offering a wide range of designs and functionality.
Creating and Customizing Looker Studio Report Templates
Intro Paragraph
Creating and customizing Looker Studio report templates is essential for businesses looking to effectively present and analyze data. By leveraging the platform’s powerful features, you can easily create visually appealing and informative reports that meet your specific needs. This guide will provide you with step-by-step instructions and tips to help you master the art of creating and customizing Looker Studio report templates.
Steps Involved in Creating a New Report Template
- Navigate to the Looker Studio homepage and click on the “Create” button.
- Select “Report” as the type of content you want to create.
- Choose a data source from the available options (e.g., Google Analytics, Google Ads, BigQuery).
- Drag and drop the desired metrics and dimensions onto the report canvas.
- Customize the layout, design, and formatting of the report.
- Save the report template for future use.
Customizing Existing Templates
- Open an existing report template in Looker Studio.
- Make changes to the data source, metrics, dimensions, or layout.
- Add or remove widgets, charts, or other elements.
- Customize the design elements (e.g., colors, fonts, logos).
- Save the customized template as a new version.
Tips for Optimizing Report Templates
- Use clear and concise titles and descriptions.
- Choose appropriate visualizations for the data you want to present.
- Keep the layout simple and easy to navigate.
- Use colors and fonts consistently throughout the report.
- Add annotations and insights to provide context and explanations.
Integrating Data Sources with Looker Studio Report Templates

Looker Studio report templates provide a powerful way to connect with various data sources, enabling you to consolidate data from multiple sources into a single report. This seamless integration allows you to create comprehensive reports that offer a holistic view of your business metrics.
Supported Data Sources
Looker Studio supports a wide range of data sources, including:
- Google Sheets
- Google Analytics
- Google Ads
- Google BigQuery
- MySQL
- PostgreSQL
- Microsoft SQL Server
Establishing Connections
Connecting to a data source in Looker Studio is a straightforward process. Simply follow these steps:
- Open your Looker Studio report template.
- Click on the “Data” tab.
- Select “Create New Data Source”.
- Choose the desired data source from the list.
- Enter the necessary connection details (e.g., server name, username, password).
- Click “Connect”.
Data Security and Privacy
When integrating data sources, it’s crucial to prioritize data security and privacy. Looker Studio employs robust security measures to safeguard your data, including:
- Encryption of data during transmission and storage.
- Role-based access control to limit user access to sensitive data.
- Compliance with industry-standard security protocols.
Additionally, it’s important to ensure that the data sources you connect to are secure and adhere to your organization’s data privacy policies.
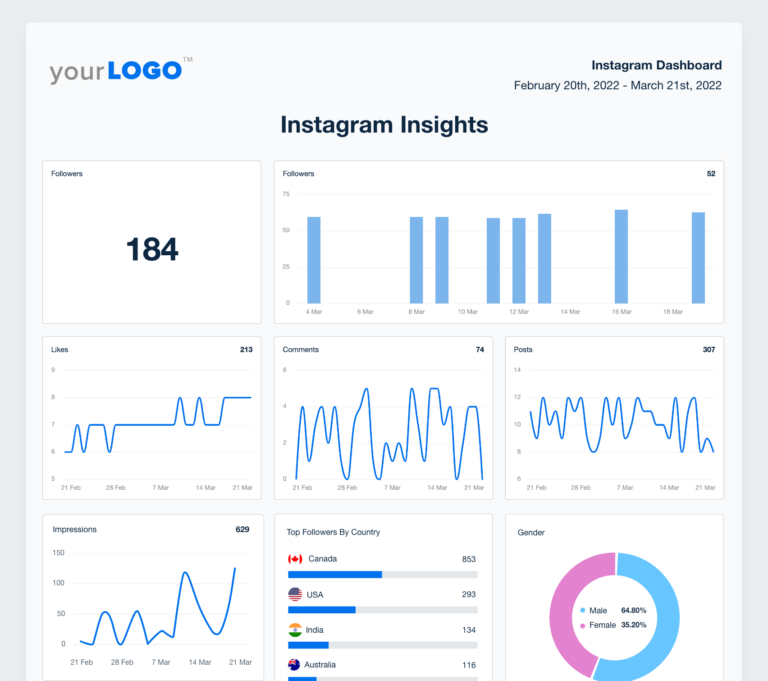
Visualizing Data in Looker Studio Report Templates
Get ready to make your data shine with Looker Studio’s top-notch visualization tools! From fancy charts to mind-boggling tables, we’ve got you covered. Let’s dive in and explore how to create stunning reports that will make your audience go “wow!”
Selecting the Right Visualization
Choosing the perfect visualization is like finding the right outfit for a party – it all depends on the data you’re rocking. Here’s a quick guide to help you match the data type with its visualization bestie:
- Bar Charts: Perfect for comparing values across categories. Like a stack of blocks, each bar represents a category.
- Line Charts: Track changes over time like a rollercoaster. Ideal for showing trends and patterns.
- Pie Charts: Show the proportion of each category in a delicious pie-shaped goodness.
- Tables: The classic choice for displaying raw data. Like a spreadsheet on steroids.
- Scatter Plots: Plot points on a graph to see relationships between two variables. Scatter like a pro!
Creating Visually Appealing Reports
Now that you’ve got the right visualizations, let’s make your reports look like a million bucks. Here are some tips to impress your audience:
- Use Color Wisely: Colors can highlight important data and make your reports pop. But don’t go overboard – stick to a few complementary colors.
- Keep it Clean: Avoid cluttering your reports with unnecessary elements. Less is more, mate!
- Add Context: Provide labels, titles, and legends to help your audience understand what they’re looking at.
- Use White Space: Leave some breathing room between elements to make your reports easy on the eyes.
- Test and Iterate: Don’t be afraid to experiment with different visualizations and see what works best for your data.
Sharing and Collaborating on Looker Studio Report Templates

Looker Studio makes it easy to share and collaborate on report templates with others. Sharing templates allows you to grant access to your reports to colleagues, clients, or anyone else who needs to view or use them. Collaboration enables multiple users to work on the same template simultaneously, making it easier to create and update reports efficiently.
Sharing Report Templates
To share a report template, click the “Share” button in the top right corner of the template editor. You can then enter the email addresses of the people you want to share the template with. You can also choose to share the template with anyone who has the link, or to make it publicly available.
Collaborating on Report Templates
To collaborate on a report template, invite others to edit the template. Once they have accepted your invitation, they will be able to make changes to the template. You can manage permissions for collaborators by clicking the “Collaborators” tab in the template editor. Here, you can add or remove collaborators, and you can also change their permissions.
Exporting and Importing Report Templates
You can also export and import report templates to share them with others. To export a template, click the “File” menu in the top left corner of the template editor and select “Export”. You can then choose to export the template as a PDF, a CSV file, or a JSON file. To import a template, click the “File” menu and select “Import”. You can then select the template file that you want to import.
Advanced Features of Looker Studio Report Templates
Looker Studio report templates offer a range of advanced features that can elevate your reporting capabilities and provide deeper insights into your data. These features include:
– Customizable widgets: Create and modify widgets to display data in unique and engaging ways. From simple charts to interactive dashboards, you can tailor your reports to meet specific requirements.
– Data blending: Combine data from multiple sources to create comprehensive reports that provide a holistic view of your business. Blend data from different databases, spreadsheets, and even third-party APIs.
– Calculated fields: Create new fields by performing calculations on existing data. This allows you to derive insights and create metrics that are not directly available in your source data.
– Advanced filtering and segmentation: Apply advanced filters and segmentation to drill down into your data and isolate specific trends or patterns. Create custom filters based on specific criteria to focus on relevant subsets of your data.
– Interactive controls: Add interactive controls to your reports, such as slicers, date ranges, and drop-downs. These controls allow users to explore data and filter reports dynamically, enhancing the user experience and facilitating self-service analytics.
– Scheduled reports and alerts: Automate report delivery and receive notifications when specific conditions are met. Schedule reports to be sent via email or exported to various formats, and set up alerts to stay informed about critical metrics.
Use Cases for Advanced Features in Different Industries
Advanced features of Looker Studio report templates find application across various industries, including:
– Retail: Create interactive dashboards that track sales performance, inventory levels, and customer behavior. Use calculated fields to analyze profitability and identify growth opportunities.
– Finance: Build reports that provide insights into financial performance, cash flow, and investment returns. Use data blending to combine data from multiple systems and create comprehensive financial statements.
– Healthcare: Develop reports that monitor patient outcomes, track disease prevalence, and analyze healthcare costs. Use advanced filtering to identify trends and patterns in patient data.
– Manufacturing: Create reports that track production efficiency, inventory management, and quality control. Use calculated fields to calculate production yields and identify areas for improvement.
– Education: Build reports that analyze student performance, track enrollment trends, and evaluate educational programs. Use data blending to combine data from different sources and gain a comprehensive view of student progress.
FAQ Summary
What are the benefits of using Looker Studio report templates?
Looker Studio report templates offer numerous benefits, including ease of use, time savings, consistency, and collaboration. They provide a starting point for creating reports, eliminating the need to start from scratch and saving valuable time. Templates ensure consistency in report design and presentation, maintaining a professional and polished appearance. Additionally, they facilitate collaboration, allowing multiple users to work on the same report simultaneously.
How do I create a new report template in Looker Studio?
Creating a new report template in Looker Studio is straightforward. Simply click on the “Create” button and select “Report Template” from the dropdown menu. You can then choose from a variety of pre-built templates or start with a blank canvas. Once you have selected a template, you can customize it to meet your specific needs by adding or removing elements, changing the design, and integrating your data sources.
Can I share Looker Studio report templates with others?
Yes, Looker Studio allows you to share report templates with other users within your organization. You can grant different levels of permissions, such as view, edit, or collaborate, to control who can access and modify your templates. Sharing templates promotes collaboration and ensures that everyone has access to the latest and most accurate information.